Invoices can be raised from the project's quick actions menu at anytime (you don't need to finish the project or have time and materials entered before you raise an invoice depending on what type you need)
From the project detail page's quick actions menu, click on Quick Invoice button to start the invoicing process.
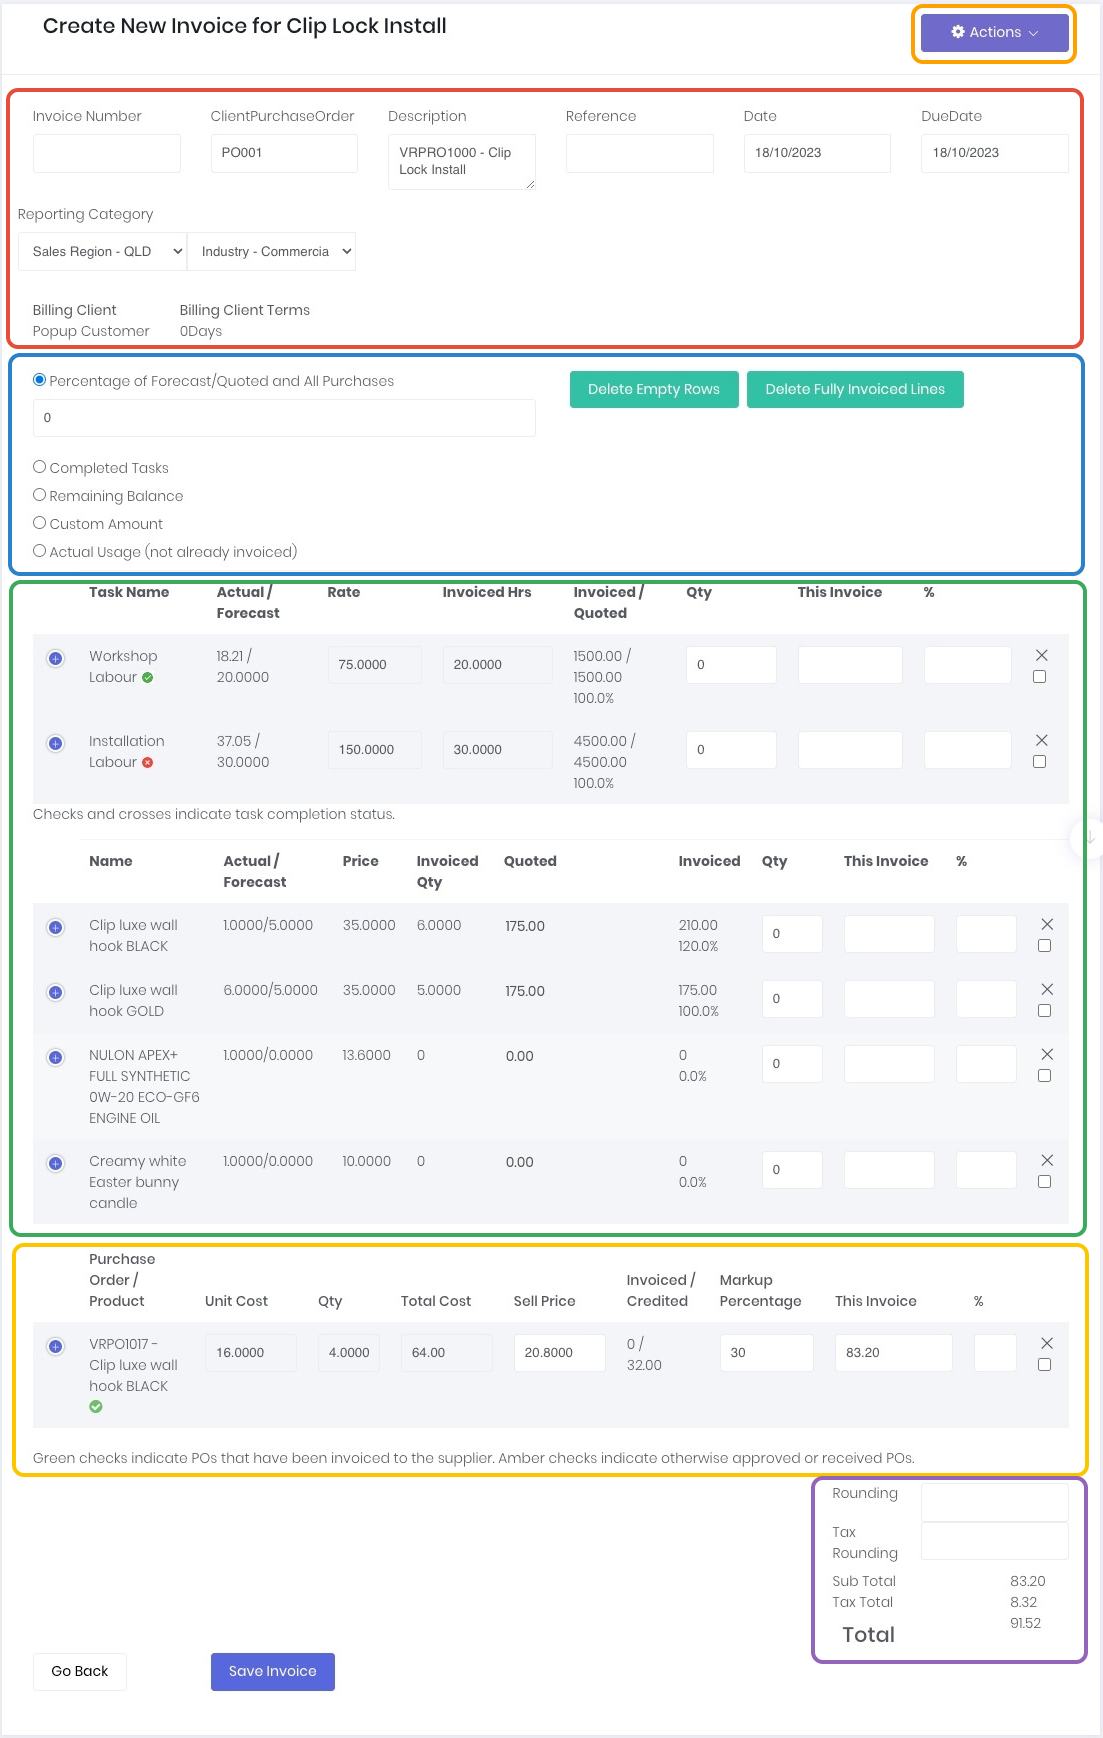
The quick invoice screen will give you a summary of the billable line items, and what has been invoiced up to now, compared to what has been originally forecast. The invoice screen is broken down to the following sections:
Invoice Details
 The invoice details allow you to review or update invoice specific information:
- Invoice Number - Leave blank to automatically assign or can be manually controlled. NOTE - must not match an existing invoice number in Xero or it cannot be imported.
- ClientPurchaseOrder - displays client PO from the project.
- Description - Invoice description. Defaults to Project Number and Project Name.
- Reference - For a reference numbers required in addition to the client purchase order, such as claim numbers etc.
- Date - Invoice date, can be forward or backdated as required. NOTE: this is the date of the invoice in Xero, not the date it was imported.
- DueDate - Invoice due date. Defaults to either the client or default terms.
- Reporting Category (If enabled) - allows you to select the required Xero reporting category. Defaults to the reporting category selected on the project.
Invoice Actions

The quick invoice's actions menu contains the following functionality:
- Reload with Actuals as at Invoice Date - If the invoice backdated, this function will update the actual amounts to reflect the values of the actuals on the project as at that date. This allows you to raise an actuals invoice correctly as at the historical date.
- Invoice Actuals at Staff Billable Rates - Switch from task rates to staff rates.
- Reload with One Line Per Staff Assignment - If multiple staff members have been assigned to a single task, this function will duplicate the task lines on the invoice to display each user's actuals separately. Note: Requires staff rates billing to be enabled on the project.
Invoice Types
 The invoice allows you to raise the following types of invoices, which one is selected depends on how and what you want to invoice the customer:
- Percentage of Forecast/Quoted and All Purchases - Best option if you invoice a percentage of the quote/forecast of all the billable line items. Best for deposit invoices raised against the full quoted/forecast amount.
- Completed Tasks - Bill the full amount of completed tasks. Suits a workflow where you raise progress invoices based on completion instead of time.
- Remaining Balance - Invoice remaining balance of each line item to the quoted/forecast totals. Useful for a final invoice for a progress invoicing.
- Custom Amount - Bill by entering a manual quantity, fixed amount or percentage of each line item. Best suites a workflow where you need to raise deposit invoices on individual line items.
- Actual Usage (not already invoiced) - Only invoice the actuals (time/materials) accrued in total for a single invoice, or actuals accrued since the last invoice for progress invoicing.
Billable Line Items
 Once the invoice type has been selected the billable lines will display the values based on the type's logic as well as current actual vs forecast and what has been invoiced to date. Rows that are not required for the invoice need to be removed by clicking the X on the end of the row. If $0 rows are left, they will display on the client's invoice. Delete Empty Rows and Delete Fully Invoiced Lines are shortcuts to remove rows in bulk.
If you notice your tax totals are incorrect, or want to confirm the accounting general ledger mappings are correct, click the blue "+" icon a the start of the billable line item and review and/or update Account Code and Tax Type as required.

Billable Disbursements
If you have marked any project purchase orders as billable, these will display in the quick invoice screen as a disbursement prompting you to invoice.

Invoice Totals
You can review and adjust the Rounding and Tax Rounding values in the invoice totals section. This allows you to have full control on the pricing, especially with rounding, without changing line item unit pricing and/or quantities.

Confirm the values match what you want to invoice the client and click Save. WorkGuru will then create a draft invoice from the project. Note the invoice will not pickup an invoice number until it is approved. Doublecheck the invoice is correct - line item value, tax etc. You can update the invoice directly via Edit. However, generally if there is an issue with invoice line totals etc, Delete the draft and re-issue from the project or stock sale with corrections.

Approve the invoice and Print or Email to Client as required. By default, approved invoices are immediately queued to be sent to Xero. If you don't want this invoice to be sent to Xero (it may already be in Xero etc) click Skip Send to Accounting.
Was this article helpful?
That’s Great!
Thank you for your feedback
Sorry! We couldn't be helpful
Thank you for your feedback
Feedback sent
We appreciate your effort and will try to fix the article