Creating a WorkGuru digital form is a two step process, firstly defining the form fields and logic, and secondly, displaying the fields on a form document template. To add the form and define the form fields, click Add Form Template from the forms dashboard. 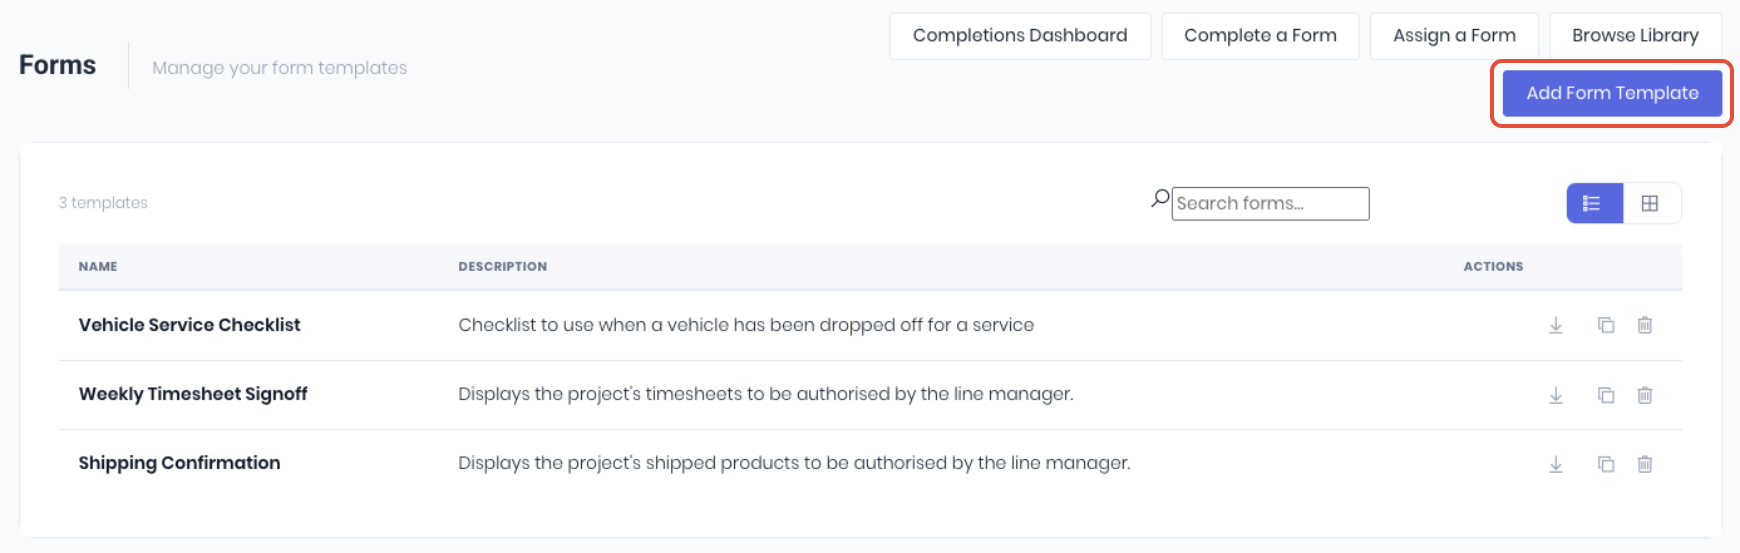
Fill out the components of the form as required:
Once complete, click Save Form to add the form ready to use.
Form Details
Complete the basic form details and assign the document template.

- Form Name - Name of the form
- Form Description - Additional details
- Template File - Select the form document template which will be used to display the form fields in the required layout. This is the form document template created as a .docx format to display the form's fields using the [FormFieldName] notation.
Form Fields
Form fields are what the form is actually capturing. The form field type allows you to validate the data is being entered correctly.
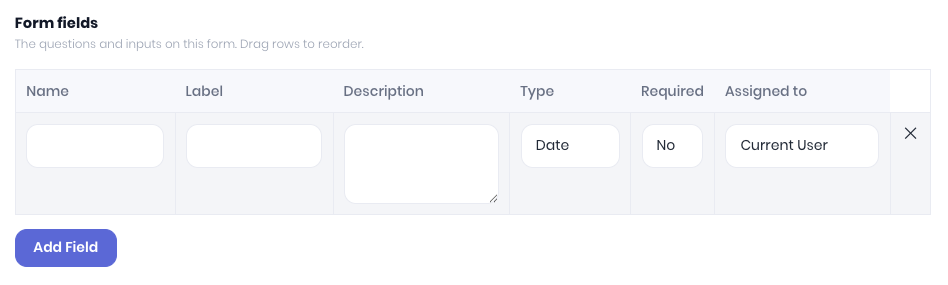
Click Add Field to add fields to the form. Note: These field lines can be dragged and dropped to change the order displayed.
- Name - Field Name, used for displaying the field on the forms document template. Can't include spaces or non-alpha characters. Equivalent to the fields's "Sku"
- Label - The label displayed on the form's data entry page.
- Description - Displays further field information on the data entry page to assist correct field population.
- Type- Field type, how will the user be prompted to capture date when completing the form.
- ShortText - Small text field, can't be extended.
- LongText - Large text box, can be extended.
- Date -Displays a calendar picker to output DD/MM/YYYY date format.
- Number - Field validated to allow only numbers.
- Signature - Captures an actual manual written signature.
- Picture - Image upload (PNG and JPG) or access camera roll in iOS and Android applications. Notes: Picture uploads require both a table description and cell containing the relevant form merge field to handle dynamic resizing. If your form field name is "FieldName", your form template must contain a table with a description "[FormFieldName]" as well as a cell within that table containing "[FormFieldname]". Instructions to set up table descriptions can be found here. Images are resized to fit the table cell while maintaining the original images aspect ratio. If the cell is not resized on the document template and left as default, the image will be scaled based on the cell width.
- Dropdown - Select from a defined list of options
- Time Sheets - Prompts for a date range and will display timesheets entered on the project within the selected period.
- Stock Usage - Prompts for a date range and will display stock usage entered on the project within the selected period.
- Custom Table - Allows you to enter multiple sets of entries for a defined question set. Displays results in a table format. Note: you can only have 1 custom table per form.
- Header - Separator used for formatting the form entry page.
- Required - Control if the field is mandatory and must be filled in to complete the form.
- Assigned To - Assign the field to only be able to be completed by specific role. Used for setting up form approval/signoff workflows in the Signing & Due Dates section.
- Current User
- Project Manager
- Client
- Client Contact
- Billing Client
- Billing Client Contact
- Assigned Staff Member
- X - Remove the field line if no longer required.
Conditional Logic
Add rules to control a field's visability based on the answer to another field. A field with a Show rule stays hidden until its condition is met. Allows you to display a specific set of fields based on data entered into a previous field.
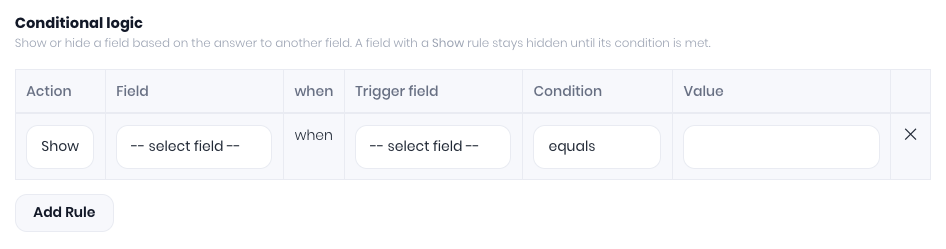
Click Add Rule to create a conditional logic rule.
- Action - Core logic, Show or Hide the field based on the trigger, condition and value.
- Field - Field label the logic rules are applied against.
- Trigger Field - Field label the logic rules are calculated against
- Condition - Logic used with the Value: equals, does not equal, is answered, greater than and is less than.
- Value - Text or numerical string used with the condition and trigger field.
Fillable On
Select via the check boxes which transactions this form can be completed against. It appears in the "Fill Form" list on those records and in the Complete-a-Form picker. New forms default to Project and Quote.

- Project
- Quote
- Asset
- Lead
- Staff Member
- General
Signing & Due Dates
When form fields are assigned to more than one user, you can manage the order the form is completed before it is finalised. WorkGuru automatically handles the notifications and progress of the form completion. The current user always fills first and other roles defined on the form (project manager, client, contacts) resolve from the project when the form is fillable on
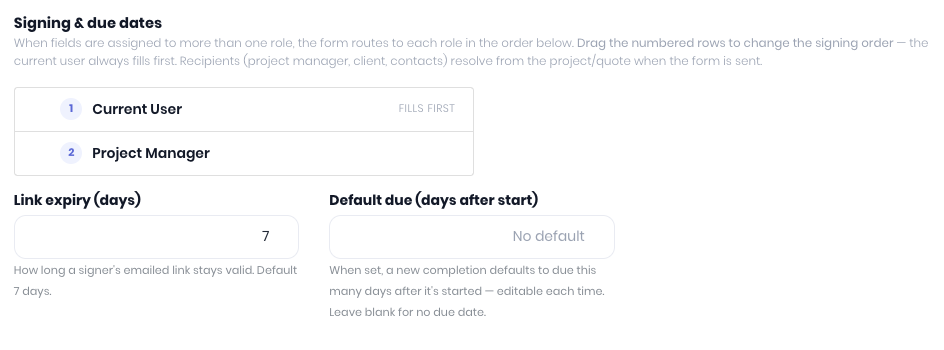
- Signing Order - Displays a list of users defined in the Assigned To fields in the Form Fields. Drag the numbered rows to change the signing order. Note: If only the Current User is displayed, you have no roles defined in the Form Fields.
- Link Expiry (Days) - How long a signer's emailed link stays valid. Default 7 days.
- Default Due (Days after start) - When set, a new completion defaults to due this many days after it's started. Leave blank for no due date.
Was this article helpful?
That’s Great!
Thank you for your feedback
Sorry! We couldn't be helpful
Thank you for your feedback
Feedback sent
We appreciate your effort and will try to fix the article